
개요
이때까지 한 내용을 정리하면,
- 회원가입을 한다.(DB에 저장)
- 로그인 시도하면, 각종 필터에서 검증하고, DB에서 해당 유저의 데이터를 이용해서 토큰을 생성해서 response해준다.
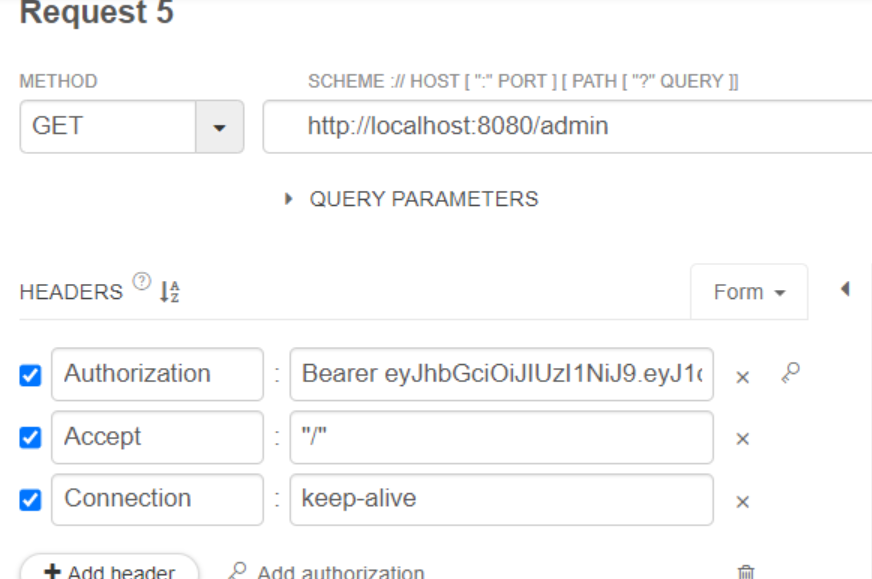
현재는 회원가입 이후 로그인시 토큰 생성까지는 됩니다. 이제 이 토큰을 이용해서 다른 링크에서 해당 유저가 로그인된 유저인지를 검증해서 정상적인 토큰이라면, 해당 페이지를 띄워줘야 합니다. 현재는 위처럼 Headers에 Authorization에 로그인시 발급받은 토큰을 같이 보내주면 permitAll된 페이지들에는 띄워지는데, admin같이 특정 권한이 필요한 곳에서는 띄워지지 않고 있습니다.
이를 위해서 스프링 시큐리티 filter chain에 요청이 담긴 JWT를 검증하기위해서 커스텀 필터를 등록해야 합니다. 필터로 요청헤더 Ahthorization 키에 JWT가 존재하면, JWT를 검증하고 강제로 SecurityContextHolder에 세션을 생성합니다.(이 세션은 Stateless로 관리되므로 요청 후 소멸된다.)
JwtFilter
@RequiredArgsConstructor
public class JwtFilter extends OncePerRequestFilter {

        private final JwtUtil jwtUtil;

        @Override
        protected void doFilterInternal(HttpServletRequest request, HttpServletResponse response, FilterChain filterChain) throws ServletException, IOException {

            //request에서 Authorization 헤더를 찾음
            String authorization= request.getHeader("Authorization");

            //Authorization 헤더 검증
            if (authorization == null || !authorization.startsWith("Bearer ")) {

                System.out.println("token null");
                filterChain.doFilter(request, response);

                //조건이 해당되면 메소드 종료 (필수)
                return;
            }

            System.out.println("authorization now");
            //Bearer 부분 제거 후 순수 토큰만 획득
            String token = authorization.split(" ")[1];

            //토큰 소멸 시간 검증
            if (jwtUtil.isExpired(token)) {

                System.out.println("token expired");
                filterChain.doFilter(request, response);

                //조건이 해당되면 메소드 종료 (필수)
                return;
            }

            //토큰에서 username과 role 획득
            String username = jwtUtil.getUsername(token);
            String role = jwtUtil.getRole(token);

            //userEntity를 생성하여 값 set
            UserEntity userEntity = new UserEntity();
            userEntity.setUsername(username);
            userEntity.setPassword("temppassword");
            userEntity.setRole(role);

            //UserDetails에 회원 정보 객체 담기
            CustomUserDetails customUserDetails = new CustomUserDetails(userEntity);

            //스프링 시큐리티 인증 토큰 생성
            Authentication authToken = new UsernamePasswordAuthenticationToken(customUserDetails, null, customUserDetails.getAuthorities());
            //세션에 사용자 등록
            SecurityContextHolder.getContext().setAuthentication(authToken);

            filterChain.doFilter(request, response);
        }
}
OncePerRequestFilter를 상속받는 JwtFilter클래스를 만들어줍니다.
Override해주는 doFilterInternal 메서드는 내부에 filter에 대한 내부구현을 진행합니다. 여기서 JwtUtil에서 만든 검증 메서드들을 사용하기 위해 JwtUtil을 주입해줍니다.
            //request에서 Authorization 헤더를 찾음
            String authorization= request.getHeader("Authorization");

            //Authorization 헤더 검증
            if (authorization == null || !authorization.startsWith("Bearer ")) {

                System.out.println("token null");
                filterChain.doFilter(request, response);

                //조건이 해당되면 메소드 종료 (필수)
                return;
}우리가 보낸 토큰을 가져오기위해 request에서 Header중에서 Authorization이라는 헤더를 뽑아서 가져옵니다.
뽑아온 키값이 null인지 Bareer를 가지고 있는지 확인합니다.
잘못되었다면, 그냥 return해서 메서드를 종료시켜주고, filter의 dofilter를 통해 필터들의 chain들을 종료하고, request, response를 다음 필터로 넘겨줍니다.
            //Bearer 부분 제거 후 순수 토큰만 획득
            String token = authorization.split(" ")[1];

            //토큰 소멸 시간 검증
            if (jwtUtil.isExpired(token)) {

                System.out.println("token expired");
                filterChain.doFilter(request, response);

                //조건이 해당되면 메소드 종료 (필수)
                return;
            }
정상이라면, token을 뽑아냅니다. authorization에서 split을 통해 띄어쓰기로 구분해서 2번째인 1번 인덱스인 토큰을 넣는다. Authorization에서 토큰 앞에 있는 Bearer를 뺀 나머지부분을 가져오기 위해서 입니다.
해당 토큰이 JwtUtils의 isExpired라는 메서드를 통해서 만료되었는지 확인합니다. 이후 마찬가지로 doFilter로 종료하고, return으로 메서드를 종료합니다.
            //토큰에서 username과 role 획득
            String username = jwtUtil.getUsername(token);
            String role = jwtUtil.getRole(token);

            //userEntity를 생성하여 값 set
            UserEntity userEntity = new UserEntity();
            userEntity.setUsername(username);
            userEntity.setPassword("temppassword");
            userEntity.setRole(role);

            //UserDetails에 회원 정보 객체 담기
            CustomUserDetails customUserDetails = new CustomUserDetails(userEntity);
두개의 검증을 지나쳐서, 최종적으로 정상적이면, 일시적인 세션을 만들어서 SecurityContextHolder라는 세션에 우리의 유저를 저장시켜주면, 특정 admin경로나 유저정보를 요청하는 곳에서 사용이 가능합니다. 방법으로는 username, role를 jwtUtil의 메서드들을 통해서 토큰에서 뽑아오고, UserEntity클래스에 값들을 넣어준다. 비밀번호값은 토큰에 안담아져 있으므로 일부러 따로 DB에 접근할 필요없이 아무 비번이나 넣어줍니다. 이 객체를 customUserDetails에 넣어줍니다.
            //스프링 시큐리티 인증 토큰 생성
            Authentication authToken = new UsernamePasswordAuthenticationToken(customUserDetails, null, customUserDetails.getAuthorities());
            //세션에 사용자 등록
            SecurityContextHolder.getContext().setAuthentication(authToken);

            filterChain.doFilter(request, response);
만들어진 customUserDetails객체를 UsernamePasswordAuthenticationToken으로 만들어서 authToken을 생성합니다. 이 토큰안에는 customUserdetails를 넘겨주고, credential은 null, authorites값은 cusUserDetails에서 Autorities를 리턴시켜주면 됩니다.
이후 SecurityContextHolder로 세션을 생성해서 해당 토큰을 이용해 특정 경로에 접근을 할 수 있게 됩니다.
메서드가 종료되었으므로 filterChain을 통해 다음 필터에게 우리가 받은 request,response를 넘겨줍니다.
이 필터를 securityConfig에 등록해서, security 동작 시 이 필터가 동작하도록 해주면 끝입니다.
JwtFilter적용
@Configuration
@EnableWebSecurity
@RequiredArgsConstructor
public class SecurityConfig {

    private final AuthenticationConfiguration authenticationConfiguration;
    private final JwtUtil jwtUtil;

    @Bean
    public AuthenticationManager authenticationManager(AuthenticationConfiguration configuration) throws Exception
    {
        return configuration.getAuthenticationManager();
    }

    @Bean
    public BCryptPasswordEncoder bCryptPasswordEncoder() {
        return  new BCryptPasswordEncoder();
    }

    @Bean
    public SecurityFilterChain filterChain(HttpSecurity http) throws Exception{

        http
                .cors((cors) -> cors.configurationSource(apiConfigurationSource()));

        http
                .csrf((auth) -> auth.disable());

        http
                .formLogin((auth) -> auth.disable());

        http
                .httpBasic((auth) -> auth.disable());

        http
                .authorizeHttpRequests((auth) -> auth
                        .requestMatchers("/login", "/", "/join").permitAll()
                        .requestMatchers("/admin").hasRole("ADMIN")
                        .anyRequest().authenticated());

        http
                .addFilterBefore(new JwtFilter(jwtUtil), LoginFilter.class); //추가

        http
                .addFilterAt(new LoginFilter(authenticationManager(authenticationConfiguration), jwtUtil), UsernamePasswordAuthenticationFilter.class);

        http
                .sessionManagement((session) -> session
                                .sessionCreationPolicy(SessionCreationPolicy.STATELESS));

        return  http.build();
}jwt필터를 특정필터 앞에 추가할 거라서 http.addFilterBefore를 통해서 추가합니다. JwtFilter를 추가합니다. JwtFilter안에 jwtUtil의 메서드를 사용하기 위해서 주입했었으므로 이역시 넣어줍니다. 이 필터는 LoginFilter.class를 앞에서 사용됩니다.
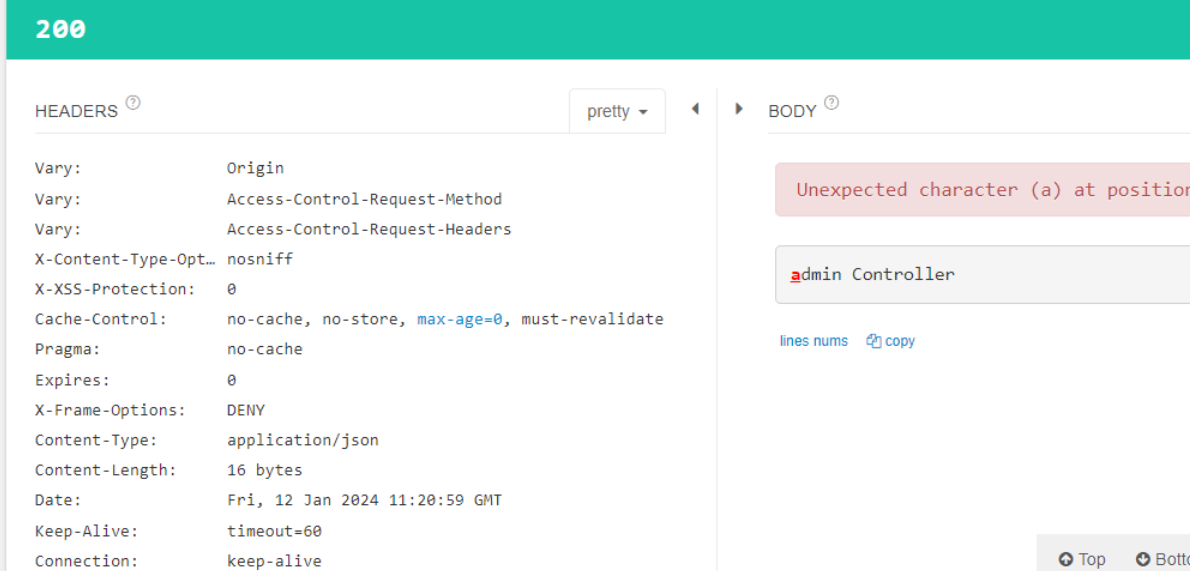
이제 admin권한이 필요한 api에 admin권한이 있는 계정을 헤더에 토큰을 담아서 보내게 되면, 정상적으로 return을 해주게 됩니다. 토큰을 뒤져서 토큰안에 있는 권한 등등을 뒤져서 인증토큰으로 해당 유저를 접근 가능하게 해줍니다.